Master Your Corrugated Metal Roof Installation
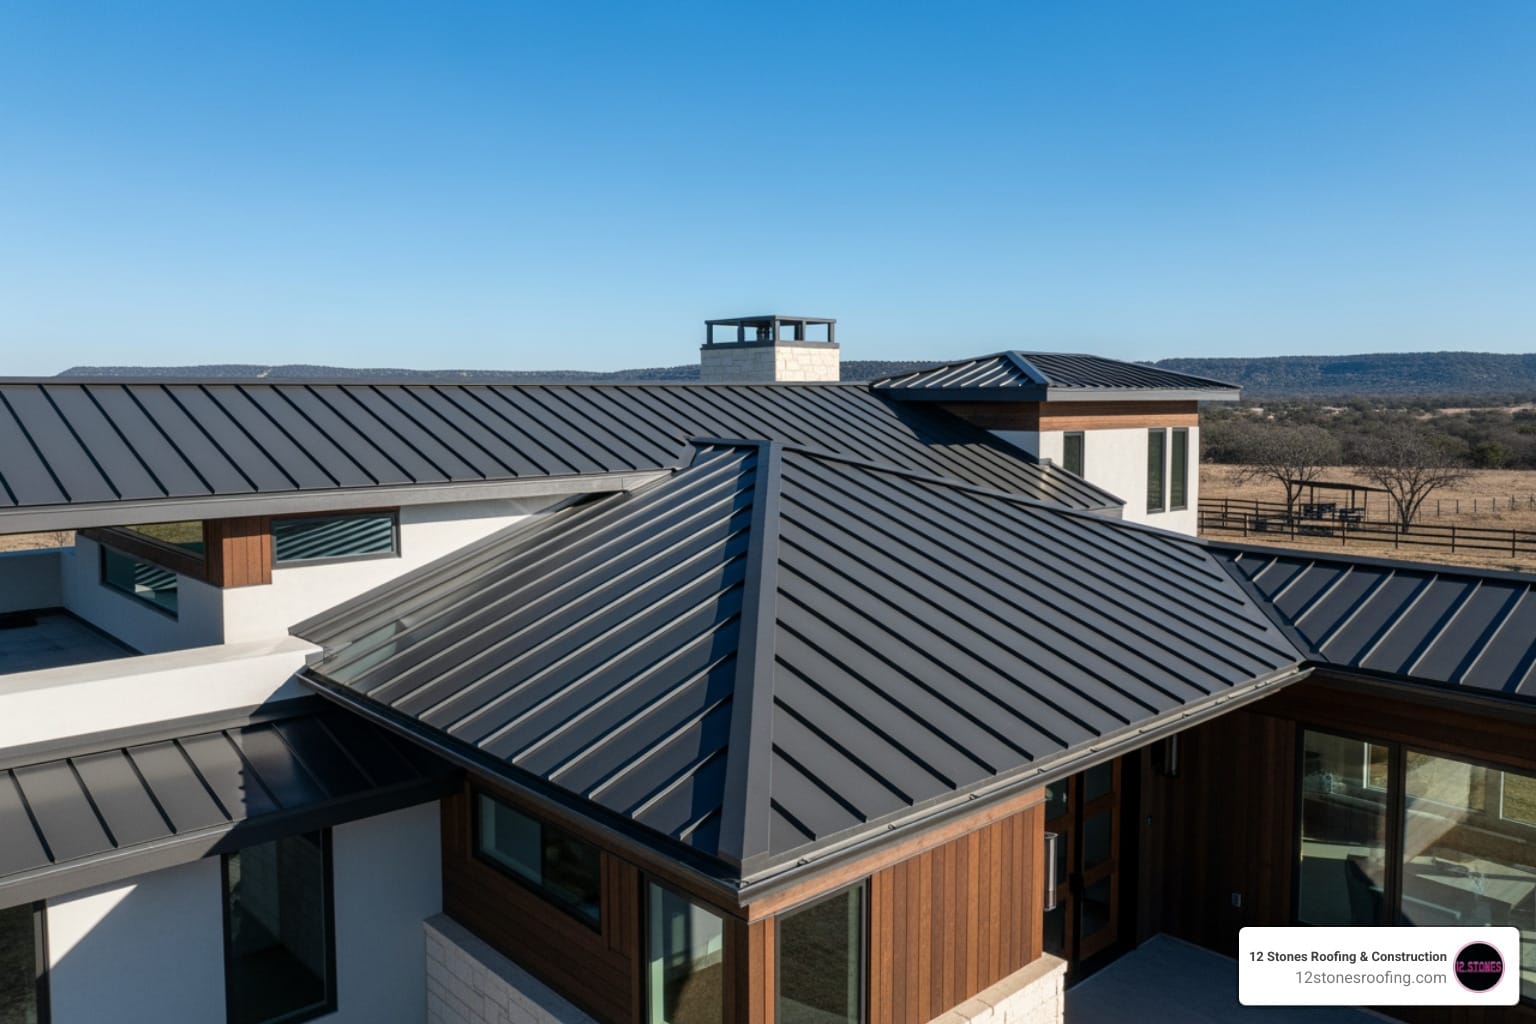
A corrugated metal roof installation is a highly achievable DIY project for those with the right skills and guidance. A corrugated metal roof is an excellent choice for homeowners seeking durability and longevity, lasting 40 to 70 years—far surpassing traditional asphalt shingles. For homeowners in Texas looking for a robust solution against harsh weather, a metal roof is a top contender. While many rely on reliable roofing services for peace of mind, this guide will walk you through every step to install your own corrugated metal roof like a seasoned pro.
To install a corrugated metal roof yourself, follow these key steps:
- Prepare Your Roof Deck: Ensure it’s clean, smooth, and square.
- Install Underlayment & Drip Edge: Create a vital moisture barrier.
- Measure & Cut Panels: Precisely size panels for a perfect fit.
- Fasten Panels Securely: Use correct screws and placement for watertight seams.
- Finish with Trim & Flashing: Seal all edges, valleys, and ridges.
I’m Jason Roberts, owner of 12 Stones Roofing & Construction. My decade-long experience in residential and commercial roofing, including numerous successful corrugated metal roof installation projects, ensures this guide offers reliable, expert insights.

Why Choose Corrugated Metal? (And What Are Your Options?)
Homeowners are increasingly choosing metal roofing for its compelling benefits, especially in areas with harsh weather like Pasadena, TX.
Metal roofs offer best longevity, lasting 40 to 70 years compared to the 15-20 year lifespan of asphalt shingles. This durability means superior protection against hurricanes, hail, and fire. Metal is also energy-efficient, reflecting solar heat to reduce cooling costs by up to 30%. Finally, metal roofing is low-maintenance, resistant to rot and insects, and can increase your home’s resale value with its modern aesthetic and proven performance.
When considering metal, you’ll find two main types: corrugated and standing seam. Corrugated roofing, our focus, uses exposed fasteners and has a wavy profile, making it more affordable and DIY-friendly. Standing seam features concealed fasteners for a sleeker look but has a higher cost and more complex installation.
Choosing the right material is a crucial decision. Steel is the most economical and crush-resistant option, while aluminum offers superior corrosion resistance for coastal areas. Copper and zinc are premium, long-lasting materials with unique aesthetic qualities.
| Material | Pros | Cons | Lifespan |
|---|---|---|---|
| Steel | Strongest, most economical, crush-resistant, good for heavy snow/hail | Can rust if not properly coated or maintained | 30-50 Years |
| Aluminum | Lightweight, corrosion-resistant (excellent for coastal areas and acid rain environments) | More expensive than steel, can dent easier | 30-50 Years |
| Copper | Extremely durable, develops a unique, attractive green patina over time | Most expensive option, requires specialized installation | 100+ Years |
| Zinc | Naturally weather-resistant, moldable for unique designs, self-healing properties | High upfront cost, can weather to a dull blue-gray | 80-100 Years |
Pre-Installation: Tools, Materials, and Safety Checklist
Proper preparation is the key to a smooth, safe, and successful corrugated metal roof installation. Gathering all your tools and materials beforehand will save you time and frustration.
Tools and Materials You’ll Need
Essential Tools:
- Measurement & Marking: Tape measure, chalk line
- Safety Gear: Safety harness & lanyard, gloves, safety goggles, rubber-soled shoes
- Cutting: Tin snips or a nibbler (preferred); circular saw with metal-cutting blade (use with caution)
- Fastening & Sealing: Electric drill with clutch, caulking gun, roofing nailer or hammer
- Access: Sturdy ladder or scaffolding
Necessary Materials:
- Roofing: Corrugated panels, roofing screws with washers (approx. 1 per sq. ft.)
- Waterproofing: High-quality synthetic underlayment, butyl tape sealant
- Trim & Flashing: Drip edge, closure strips, ridge cap, and other trim as needed (gable, valley, sidewall, etc.)
Safety and Roof Preparation
Safety is non-negotiable. Installing a metal roof is dangerous, so always take extreme caution.
- Fall Protection: Always use a correctly anchored safety harness and lanyard. Never walk on unsecured panels.
- Weather: Do not work in windy, wet, or icy conditions. Metal is extremely slippery when wet.
- PPE: Wear gloves to protect from sharp edges and safety goggles to shield your eyes from debris.
- Panel Handling: Carry panels vertically. They are slippery and have sharp edges. Use a forklift or crane for very long panels.
Before you begin, measure your roof accurately to calculate the necessary materials. Multiply the length and width of each roof plane to find the total square footage. Order 10-15% extra material to account for waste and cutting errors. Store panels in a dry, well-ventilated area off the ground to prevent moisture damage or “white rust.”
If this preparation feels overwhelming, a professional team can ensure the job is done safely and correctly. For homeowners in the Pasadena, TX area, call 12 Stones Roofing & Construction at (281) 975-2959 for expert assistance.
The Ultimate Corrugated Metal Roof Installation Guide

This guide breaks down the corrugated metal roof installation process into five manageable steps. Follow these instructions carefully for a professional-grade, watertight result that will protect your home for decades.
Step 1: Roof Deck Preparation and Squaring
A solid foundation is critical. For best results, perform a complete tear-off of old shingles to inspect the underlying wood sheathing for rot or damage. Make all necessary repairs and ensure the deck is a clean, smooth surface, free of old nails or debris. Since most roofs aren’t perfectly square, use the 3-4-5 triangle method to establish a square reference line. Measure 3 feet along the eave and 4 feet up the rake; the diagonal between these points must be 5 feet. Snap a chalk line to guide your first panel. You can watch a video on how to square a roof for a visual guide.
Step 2: Installing Underlayment and Drip Edge
This is your secondary water barrier. Install a high-quality synthetic underlayment, starting at the eave and rolling it out horizontally. Overlap each subsequent row according to the manufacturer’s instructions to create a continuous barrier. Next, install the drip edge flashing. Place it along the eaves first (under the underlayment), then along the rakes (over the underlayment), to direct water away from your fascia. A helpful tutorial can show you how to install peel and stick underlayment.
Step 3: A Guide to Cutting and Preparing Corrugated Metal Panels
Precision is key. Use tin snips or a nibbler for clean cuts that won’t damage the panel’s coating. Avoid abrasive blades like angle grinders, as the heat can ruin the finish and void your warranty. Always measure twice, cut once, preferably on the ground for safety and control. After cutting, you must clean all metal filings (swarf) immediately with a soft brush or leaf blower. These filings will rust and cause permanent stains on your new roof.
Step 4: Proper Techniques for Corrugated Metal Roof Installation and Fastening
This step determines if your roof will be watertight. Start your first panel at the end of the roof opposite the prevailing wind, ensuring it is perfectly square with a 1-2 inch overhang at the eave. For panel overlaps, lap the side of the next panel over the previous one by one or two corrugations. Apply a continuous bead of butyl tape sealant along the seam before overlapping to create a watertight gasket. For end overlaps, the amount depends on roof slope (6-12 inches) and requires two rows of sealant tape.
Screw placement is critical: always fasten screws through the high part of the corrugation (the crest), never the valley where water flows. Use a drill with a clutch to drive screws until the washer is snug but not squashed. Over-tightening can dimple the panel and break the seal. This demonstration video shows the correct screw placement for corrugated roofing.
Step 5: Finishing with Trim, Flashing, and Ridge Caps
These final details complete your roof’s weatherproofing. Install foam closure strips at the eave and ridge to block pests and wind-driven rain. Install gable/rake trim along the sloped sides to cover panel edges. Use specialized valley, sidewall, and endwall flashing wherever the roof meets a wall or another roof plane. Seal around any vents or pipes with flexible rubber pipe boots. Finally, install the ridge cap at the roof’s peak, overlapping the panels and sealing all seams to complete the installation.
Common Mistakes and When to Call a Pro

Even a diligent DIYer can face challenges with a corrugated metal roof installation. Knowing common pitfalls and when to call an expert is key to a successful outcome.
Mistakes to Avoid
A successful installation hinges on attention to detail. Avoid these common errors:
- Incorrect Fastener Placement: Screws must go in the high rib of the corrugation, not the valley where water channels.
- Improper Screw Tension: Over-tightening screws dimples the panel and breaks the washer’s seal, while under-tightening leaves a gap for water.
- Insufficient Panel Overlap: Not overlapping panels correctly at the sides or ends creates an entry point for water.
- Forgetting to Clean Swarf: Metal shavings left from cutting will rust and cause permanent stains, voiding your warranty.
- Poorly Installed Flashing: Incorrectly installed drip edges, valley flashing, or ridge caps are a primary cause of leaks.
- Ignoring Preparation: Failing to square the roof or properly install underlayment leads to a leaky and unprofessional-looking finish.
When to Hire a Professional
While DIY is rewarding, some situations are best left to professionals to ensure safety and quality.
Consider calling a pro if your roof has a steep pitch or a complex design with multiple hips, valleys, or dormers. These features require advanced flashing techniques. If you lack proper safety equipment or experience working at heights, it is always safer to hire an expert. Furthermore, if you find significant structural damage like rot or sagging in the roof deck, a professional contractor should assess and repair it.
For complex projects, or if you’re in the Pasadena, TX area and want a guaranteed professional result, contacting a certified team like 12 Stones Roofing & Construction is your best bet. A professional metal roofing installation ensures the job is done right, is backed by a warranty, and provides invaluable peace of mind.
Frequently Asked Questions about Corrugated Metal Roofs
Here are answers to common questions we receive about corrugated metal roof installation.
How do you install a corrugated metal roof in areas with heavy snow or ice?
To prevent ice dams and snow slides, always install panels on a minimum roof slope of 3/12. This angle helps snow and water shed effectively. We also strongly recommend installing snow guards above entryways and walkways to allow snow to melt gradually instead of sliding off in a dangerous sheet. Finally, ensure all panel overlaps are thoroughly sealed with high-quality sealant to block water intrusion from melting ice.
How does proper installation contribute to energy efficiency?
A properly installed metal roof boosts energy efficiency in two ways. First, the metal’s high solar reflectivity bounces radiant heat away from your home, which can reduce attic temperatures significantly. Second, installing a vented ridge allows hot air to escape the attic, creating a natural cooling effect. Combined with a “cool roof” paint finish, these features can lower cooling costs by up to 20-30%.
What is the correct way to clean metal filings (swarf) off the roof?
Metal filings (swarf) must be removed immediately after cutting panels to prevent rust stains that can void your warranty. The correct method is to use a soft-bristled brush, a leaf blower, or a soft cloth to gently sweep the filings away. Never use a wire brush or grinder, as these abrasive tools will scratch the panel’s protective coating and lead to premature corrosion.
How do polycarbonate roof panels differ from metal roof panels?
Polycarbonate and metal panels serve different purposes. Polycarbonate is a transparent plastic used for structures where you want natural light, such as patios, sunrooms, or skylights. It is lightweight and flexible. In contrast, metal is an opaque material chosen for its superior strength, durability, and longevity in protecting a home’s primary structure. While polycarbonate is great for specific applications, metal offers far greater resistance to impact and extreme weather, making it the ideal choice for your main roof.
Conclusion
Installing a corrugated metal roof is a rewarding project that adds immense value and protection to your home. By following the steps in this guide, prioritizing safety, and paying close attention to details like screw placement and sealing overlaps, you can achieve a professional-quality result.
Your new corrugated metal roof installation provides superior protection against harsh Texas weather, lowers energy costs, and boosts your home’s curb appeal and resale value. Key practices like fastening on the high ribs, using butyl tape on seams, and cleaning up metal filings are what ensure a leak-free roof that lasts for decades.
If a project’s complexity exceeds your comfort level, especially on roofs with steep pitches or intricate designs, professional assistance is the wisest choice. An expert ensures the job is done safely, efficiently, and correctly.
Ready to upgrade to a roof that lasts a lifetime? Whether you’re tackling a DIY project or prefer the peace of mind that comes with professional installation, explore your options and get a professional assessment for your metal roofing project. Our team at 12 Stones Roofing & Construction is here to help homeowners in the Pasadena, TX area make the smartest investment for their homes.