How to Find and Fix a Roof Leak (Step-By-Step Guide)
How to find and fix a roof leak starts with identifying visible signs like water stains on ceilings, then systematically inspecting your attic and roof exterior to locate the source. Once found, most small leaks can be repaired by replacing damaged shingles or sealing gaps around vents—though knowing when to call a professional is critical. For homeowners who need expert help, scheduling an inspection through a trusted roofing contractor ensures proper diagnosis and prevents structural damage.
Quick Answer: Finding and Fixing a Roof Leak
- Identify signs – Look for water stains, musty odors, or damaged shingles
- Locate source – Check attic for water trails, inspect roof penetrations
- Test with water – Use garden hose on suspected areas while helper watches inside
- Gather tools – Ladder, safety harness, pry bar, roofing cement, replacement shingles
- Make repair – Replace damaged shingles, reseal flashing, or patch small holes
- Test work – Spray water on repaired area to confirm leak is gone
A leaky roof demands immediate attention. Even a small drip can travel through your roof deck, soak insulation, damage drywall, and create mold breeding grounds within 24-48 hours. According to insurance claims data, the average roof leak repair costs $175 to $450, but catching it early can prevent thousands in structural damage.
Water rarely drips straight down—it can seep through a tiny gap, travel several feet along rafters, then drip into your living space. That bedroom ceiling stain might originate from a damaged vent boot on the opposite side of your roof. This is why finding the source is often harder than fixing it.
For Texas homeowners, severe thunderstorms, hail, and intense UV exposure create vulnerabilities that lead to leaks. Understanding what you can tackle yourself versus when to call professionals is essential for protecting your property.
I’m Jason Roberts, owner of 12 Stones Roofing & Construction, and over the past decade I’ve personally overseen hundreds of leak repairs across the Gulf Coast. Learning how to find and fix a roof leak starts with understanding warning signs and having a clear process to locate and address problems safely.
 Identify interior signs like water stains and exterior signs like damaged shingles, 2) Inspect attic with flashlight for water trails and roof exterior for damaged areas, 3) Perform garden hose water test with helper inside, 4) Gather safety equipment including ladder and harness plus repair materials like roofing cement and replacement shingles, 5) Execute repair by replacing shingles or sealing flashing, 6) Test repair with water spray to confirm leak is stopped - how to find and fix a roof leak infographic")
Step 1: Identifying the Telltale Signs of a Roof Leak
Before you can fix a leak, you must confirm you have one. Water damage isn’t always as obvious as a steady drip. Be on the lookout for subtle clues both inside and outside your home.

Interior Signs
Water stains on ceilings or walls are the most common indicators of a roof leak. These often appear as discolored patches, sometimes yellowish or brownish. Peeling or bubbling paint on ceilings or upper walls also signals moisture intrusion. If water has accumulated, you might notice sagging drywall, which indicates structural damage and a significant amount of water. A persistent musty or earthy odor, even without visible water, can be a red flag for hidden mold growth within your walls or attic.
Exterior Signs
From the ground, you can often spot exterior signs of a leak. Look for damaged, cracked, or missing shingles. These compromised shingles create direct entry points for water. Loose granules in your gutters are another subtle sign that your asphalt shingles are deteriorating, exposing the underlying mat to the elements. Clogged or overflowing gutters, especially after a heavy rain, can cause water to back up under your shingles, leading to leaks. Finally, inspect the flashing around chimneys, vents, and skylights for any visible damage, cracks, or gaps, as these are critical areas designed to prevent water intrusion.
Ruling Out Other Issues
It’s crucial to differentiate a roof leak from other household moisture problems. Sometimes, what appears to be a roof leak is actually attic condensation or a plumbing issue. Poor attic ventilation can cause warm, moist air from your home to condense on the cold underside of the roof deck, mimicking a leak. Similarly, a leaking pipe in an upstairs bathroom or an overflowing HVAC drip pan can create ceiling stains that look exactly like roof damage. Before assuming a roof leak, we recommend checking for any Fixing Leaky Pipe issues first. If you still suspect a roof issue, proceed with our systematic search.
Step 2: How to Find the Source of a Roof Leak (Inside and Out)
Water rarely drips straight down; it can travel along rafters and sheathing before showing up inside, making the source difficult to locate. A systematic search is essential.

The Attic Inspection
The attic is often your first and best line of defense in locating a leak. With a powerful flashlight, enter your attic and look for water stains, black marks, or mold on the underside of the roof deck, rafters, and insulation. Pay close attention to areas where the roof planes meet or around any roof penetrations. Follow any water trails or discoloration uphill along the wood framing or sheathing. This upward path will often lead you directly to the entry point. Look for dark spots on wood or insulation, mold growth, or even condensation on nails (sometimes called “shiners”) which can indicate where water is getting in or where moisture is condensing due to poor ventilation.
The Exterior Inspection
Once you have an idea of the general area, it’s time to inspect the roof’s exterior. For safety, we recommend using binoculars from the ground first to scan for obvious damage. If you’re comfortable and have the proper safety equipment, you can then safely go onto the roof. Focus your inspection on common failure points:
- Roof Penetrations: These are the most common sources of leaks. Carefully examine the flashing around chimneys, vent pipes (including plumbing vent boots), and skylights. Look for cracks, separations, or deteriorated sealant.
- Shingles: Check for any missing, cracked, curled, or damaged shingles. Even a small chip can allow water to seep underneath.
- Valleys: These are the V-shaped channels where two roof planes meet. Debris often collects here, and damaged flashing in valleys can lead to significant leaks.
- Dormers and Walls: Inspect the step flashing and caulking where a wall or dormer meets the roofline. Cracked or missing caulk can allow water to penetrate.
The Water Test
If the source is still hidden after your interior and exterior inspections, it’s time for the water test. This method simulates rainfall to pinpoint the exact entry point. You’ll need a helper for this.
- Preparation: Have your helper stay inside, ideally in the attic, near the suspected leak area. Equip them with a flashlight and a way to communicate with you.
- Start Low: Go onto the roof with a garden hose. Begin by soaking the area directly above where the leak appears inside, starting low on the roof.
- Systematic Soaking: Work your way slowly upward, soaking one section of the roof at a time. Saturate each section for several minutes before moving to the next. This patience is crucial, as water can travel a long way before appearing inside.
- Communication: Have your helper signal you immediately when they see water dripping inside. Once they do, note the exact section you were soaking. This is your leak source.
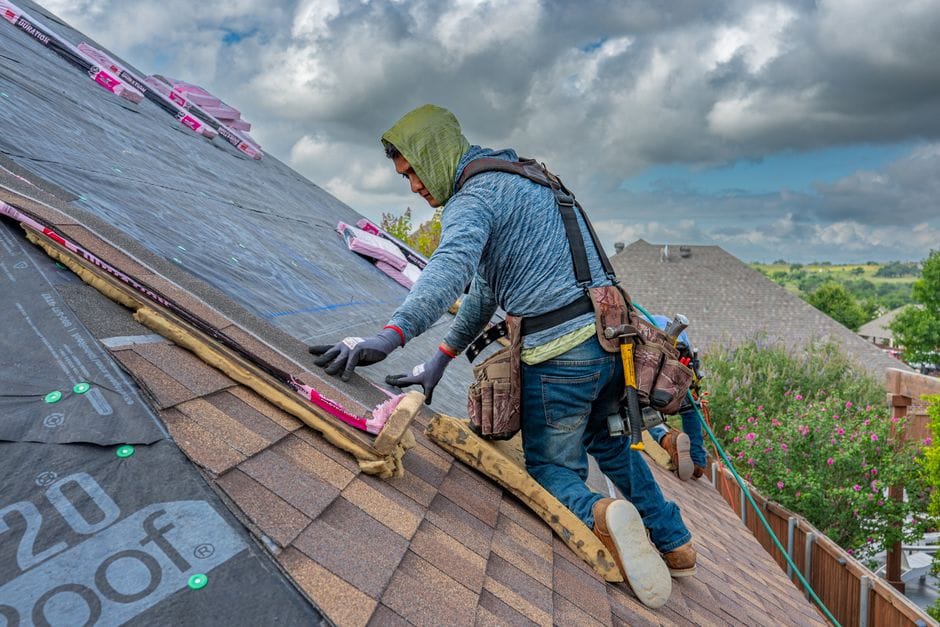
Step 3: Assembling Your Toolkit and Prioritizing Safety
Attempting roof repair without proper equipment and safety measures is dangerous. Falls from roofs cause over 100 construction fatalities annually. Prepare properly before beginning.
Essential Tools & Materials
Having the right gear ensures successful and safe repair:
- Sturdy extension ladder: Must extend 3 feet above roofline
- Safety harness and rope: Personal fall arrest system is non-negotiable
- Pry bar: For lifting and removing damaged shingles
- Hammer: For securing new shingles
- Roofing nails: Specifically designed for roof applications
- Utility knife: For cutting shingles or flashing
- Caulk gun: For applying sealants
- Roofing sealant/cement: Waterproof adhesive for sealing
- Replacement shingles: Match existing ones closely
- Flashing material: If replacing damaged flashing
- Soft-soled boots: For better grip
- Gloves, safety glasses: For protection
- Charged cell phone: For emergencies
Safety First
Safety is paramount when working on roofs, especially in Texas where weather is unpredictable.
- Choose the right day: Work only on dry, calm days. Wet or windy conditions drastically increase slip risk
- Secure your ladder: Place on stable, level ground extending 3 feet above roofline. Have helper steady it
- Wear appropriate footwear: Soft-soled rubber shoes provide best grip
- Never work alone: Always have someone present who can assist in emergencies
- Mind your steps: Walk carefully, distribute weight evenly, avoid weak areas
Understanding Fall Protection
For roofs with pitch greater than 4:12, personal fall arrest systems (PFAS) are critical. This includes harness, lanyard, and secure anchor point. Review this guide provided by Princeton University for proper usage. If uncomfortable, calling professionals is wisest choice.
Step 4: A Homeowner’s Guide on How to Find and Fix a Roof Leak
Once you’ve located the leak and have your safety gear, you can proceed with the repair. Most minor leaks are caused by a few common culprits.
How to find and fix a roof leak from damaged shingles
Damaged shingles are one of the most frequent causes of roof leaks. Asphalt shingles typically last 20 years, but harsh Texas weather can shorten that lifespan.
- Shingle Types: Curled, cracked, or missing shingles are all vulnerabilities that allow water to penetrate. Curled shingles might just need to be re-adhered, while cracked or missing ones require replacement.
- Process for Repairing Cracked or Missing Shingles:
- Prepare: Gently lift the shingle directly above the damaged one. If it’s stiff, you can carefully use a heat gun (on a low setting and from a distance) to make it more pliable, but be very cautious not to overheat or damage it.
- Remove: Use a pry bar to carefully remove the nails holding the damaged shingle in place. Once the nails are out, slide the damaged shingle out from under the overlapping shingle. Inspect the roof deck beneath for any signs of water damage or rot.
- Install New Shingle: Slide the new shingle into the gap, ensuring it aligns perfectly with the shingles on either side and is tucked fully under the row above.
- Secure: Drive four new roofing nails through the top edge of the new shingle, about one inch under the edge of the above row, spacing them equally.
- Seal: Apply a generous dab of roofing cement over each nail head to create a watertight seal. You can also apply a small amount of roofing cement under the bottom edge of the new shingle and the shingle above it to help them bond and prevent wind uplift.
- Further Reading: For more detailed instructions on shingle replacement, you can refer to resources like Replace Broken Shingles:
How to find and fix a roof leak around flashing and vents
Flashing is a thin material, usually metal, installed around roof penetrations and junctions to divert water. When flashing or its sealant fails, leaks are almost guaranteed.
- Common Failures: The seals around chimneys, vent pipes (including plumbing vent boots), skylights, and in roof valleys are frequent leak sources. These areas experience a lot of stress from weather and roof movement.
- Repairing Cracked Sealant:
- Clean: For cracked or deteriorated sealant around flashing (e.g., at the base of a chimney or skylight), carefully scrape away all the old, brittle material using a putty knife or utility knife. The area must be clean and dry for the new sealant to adhere properly.
- Apply New Sealant: Apply a new, generous bead of high-quality, exterior-grade roofing cement or waterproof silicone caulk. Ensure complete coverage over any gaps or cracks.
- Repairing Damaged Plumbing Vent Boots:
- Inspect: Check the plumbing vent boot for cracks in its plastic base, broken seams in metal bases, or a rotted/torn rubber boot around the pipe.
- Replace: If the rubber boot is cracked or torn, it’s usually best to replace the entire boot. Carefully remove the old boot and any surrounding shingles, install the new boot, and re-shingle around it. Make sure to use washer-head roofing screws to secure the boot’s base, and seal the screw heads with roofing cement.
- Loose Nails: If the boot itself is intact but the nails holding it are loose or missing, replace them with new washer-head roofing screws and seal them.
- Related Repairs: For leaks on metal roofs, which often occur at seams or around fasteners, our guide on Leaking Metal Roof Repair provides specific solutions.
Sealing Small Holes and Punctures
Sometimes, leaks originate from seemingly insignificant small holes or punctures in your roof.
- Causes: These small holes are often left by old satellite dish mounts, antenna brackets, or even improperly driven roofing nails that have backed out over time. Tree branches or debris can also cause small punctures.
- The Fix:
- Clean: Thoroughly clean the area around the hole, ensuring it’s free of dirt, granules, and moisture.
- Apply Sealant: Apply a dab of roofing sealant or roofing cement directly over the hole. Spread it slightly wider than the hole to ensure good coverage.
- Reinforce (Optional but Recommended): For a more durable and long-lasting repair, especially if the hole is slightly larger or in a vulnerable spot, you can reinforce it. Slide a small piece of metal flashing (cut to size) under the shingle covering the hole. Then, apply roofing cement around the edges of the flashing piece and over the hole for added protection. Roofing tape can also be used for immediate, temporary reinforcement.
DIY vs. Professional Roof Repair: When to Call an Expert
Knowing your limits is crucial for any DIY project. While fixing one or two shingles is manageable, many situations require professionals.
Good DIY Projects
Homeowners can tackle these repairs:
- Replacing few missing/damaged shingles on single-story, low-pitch roofs
- Sealing small holes or punctures from stray nails
- Re-caulking cracked sealant around easily accessible flashing
- Making Temporary Roof Leak Fix during storms until professional help arrives
When to Call a Pro
Certain instances require professional roofers:
- Large or Unidentified Leaks: Extensive leaks or those you can’t locate need expert diagnosis with specialized tools
- Steep Roofs: Roofs with pitch greater than 4:12 are significantly more dangerous, requiring specialized safety equipment
- Signs of Rotted Wood: Rotted deck, rafters, or fascia indicate long-standing leaks compromising structural integrity
- Uncomfortable with Heights: If uneasy about heights or lacking proper safety gear, call professionals
- Warranty Concerns: DIY repairs on new roofs might void manufacturer warranties
Cost Considerations
Professional repair prevents costlier damage. Average leak repair costs $175-$450, but water damage can lead to thousands in structural repairs and mold remediation. Professional roofers typically charge $400-$1,000 for most repairs, with small leaks on lower end. This investment is minimal compared to repairing water-damaged ceilings, insulation, or structural components. See our guide on Water Damage Roof Cost for more insight.
Emergencies
For severe active leaks threatening significant damage, you may need Emergency Roofing Services Complete Guide. Priority is containing water inside before calling professionals.
Preventing Future Leaks and Testing Your Repair
Once your repair is complete, you need to test it and take steps to prevent new leaks from forming. Proactive maintenance is the best way to protect your roof.
Testing Your Work
After you’ve completed your repair, it’s crucial to confirm that you’ve successfully stopped the leak.
- Wait for Dry Weather: Ensure the repair area has had sufficient time to cure, especially if you used roofing cement or sealant.
- Hose Test: Use the same garden hose method you used to find the leak. Soak the repaired area thoroughly for several minutes.
- Internal Check: Have your helper check inside the attic or the affected interior space to confirm that no water is coming through. If it stays dry, congratulations! You’ve successfully fixed the leak. If you still see water, it means the source is either not fully sealed or there’s another leak nearby that you missed.
Preventative Maintenance Tips
The best way to deal with a roof leak is to prevent it from happening in the first place. Regular maintenance is key, especially with the weather extremes we experience in Pasadena and the greater Houston area.
- Schedule Professional Inspections: A professional roof inspection is recommended at least twice a year, ideally in spring and fall, and always after major storms like severe thunderstorms or hail. Experts can spot potential issues before they become costly leaks.
- Keep Gutters Clean: Clogged gutters are a major cause of water backup, which can force water under your shingles and lead to leaks. Clean your gutters regularly, especially after leaves fall, to ensure proper drainage.
- Trim Overhanging Branches: Tree branches that rub against your roof can abrade shingles, causing damage over time. Strong winds can also cause branches to break off and puncture your roof. Keep them trimmed back to prevent damage and debris buildup.
- Periodically Check Your Attic: Even without a visible leak inside, an occasional check of your attic for new stains, mold, or musty odors can help you catch a small leak early. This is especially important after heavy rain or strong winds.
Frequently Asked Questions about Finding and Fixing Roof Leaks
How long can you go without fixing a leaky roof?
You should fix a leaky roof immediately. Even a small leak can cause significant damage in a short time. Water can saturate wood, ruin insulation, and create the perfect environment for mold to grow in as little as 24-48 hours, leading to much more expensive repairs. Ignoring a leak can also compromise your home’s structural integrity over time.
Can condensation in my attic be mistaken for a roof leak?
Yes. Poor attic ventilation is a common culprit. Warm, moist air from inside your home can rise into the attic and condense on the cold underside of the roof deck, especially during colder months. This condensation can then drip down, mimicking a leak. A professional roofer or HVAC specialist can determine if the issue is a genuine roof leak or a ventilation problem.
What is the fastest way to make a temporary roof leak fix?
For a temporary fix during a storm, you can place a bucket under the drip inside. To protect the interior further, you can carefully poke a small hole in the center of the water-filled bulge in your ceiling. This will relieve pressure and direct the water into a container, preventing a larger ceiling collapse. On the roof, the fastest temporary patch is to cover the suspected area with a heavy-duty tarp, securing it with sandbags or nailing it down with boards (though be careful not to create new holes!). You can also use roofing cement or roofing tape for small holes, but these are not long-term solutions. Our guide on Temporary Roof Leak Fix offers more detailed steps.
Your Next Steps for a Leak-Free Home
Finding and fixing roof leaks is crucial for homeowners. Many minor issues are repairable following systematic processes of identifying, locating, and safely repairing sources. This protects homes from significant water damage. However, prioritize safety and recognize when jobs are too big or dangerous. For complex leaks or steep roofs in Pasadena, TX area, certified experts at 12 Stones Roofing & Construction have experience to solve problems correctly.
If you need professional assessment or guaranteed repair, schedule your Roof Repair with our team today. Call us at 281-650-3575 to ensure your home stays dry and protected.