
Why Easy Roof EPDM Is One of the Smartest Flat Roofing Choices You Can Make
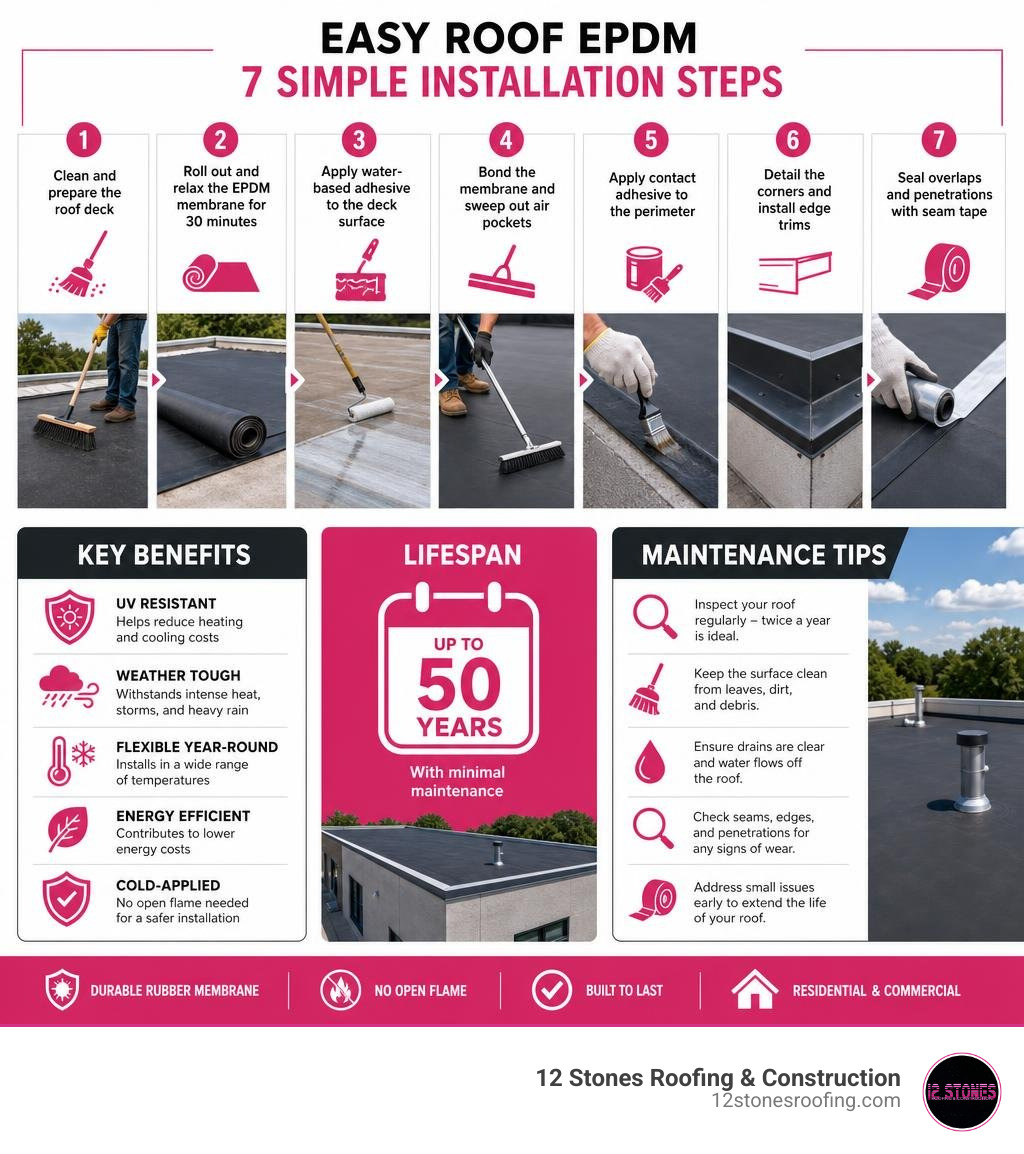
An easy roof EPDM system is one of the most practical flat roofing solutions available today — especially for property owners in Texas who deal with intense heat, UV exposure, and severe storms. Here is a quick summary of the EPDM installation process:
- Clean and prepare the roof deck
- Roll out and relax the EPDM membrane for 30 minutes
- Apply water-based adhesive to the deck surface
- Bond the membrane and sweep out air pockets
- Apply contact adhesive to the perimeter
- Detail the corners and install edge trims
- Seal overlaps and penetrations with seam tape
EPDM — short for ethylene propylene diene monomer — is a synthetic rubber membrane that comes in a single seamless sheet. It installs with cold-applied adhesive, requires no open flame, and can last up to 50 years with minimal maintenance. It is flexible enough to install year-round, even in cold temperatures, and its UV resistance helps reduce heating and cooling costs over time.
If your flat roof is aging or has taken storm damage, this guide walks you through every step. Our EPDM roofing services at 12 Stones Roofing & Construction cover everything from full installations to repairs across the Pasadena, TX area.
I’m Jason Roberts, owner of 12 Stones Roofing & Construction — a Service-Disabled Veteran-Owned firm with over a decade of hands-on experience installing and repairing easy roof EPDM systems on commercial and residential properties throughout the Gulf Coast region. Whether you’re a first-time installer or a building manager protecting a commercial asset, this step-by-step guide gives you everything you need to get it right.
Easy easy roof epdm glossary:
What is EPDM and Why Choose an Easy Roof EPDM System?
If you are researching flat roofing options, you have likely run into the term EPDM. EPDM stands for ethylene propylene diene monomer. Because this material is manufactured from a highly durable synthetic rubber compound, the industry often simply calls it “rubber roofing.” It is a single-ply membrane that has protected commercial and residential buildings globally for over half a century.
When you work with a trusted Pasadena roofing contractor like 12 Stones Roofing & Construction, you gain access to a material engineered specifically for high-stress environments. EPDM is highly resistant to ozone, extreme temperatures, and heavy weather. It is a preferred choice for flat and low-slope structures because it is cost-effective, incredibly durable, and straightforward to install. For a deep dive into the history and chemistry of this material, check out our EPDM Roofing Complete Guide.
The Benefits of Lightweight and Flexible Rubber Membranes
One of the greatest engineering advantages of EPDM is its physical weight. EPDM is incredibly lightweight compared to traditional multi-layer built-up roofs or heavy asphalt shingles. This low weight means it exerts minimal structural load on your building’s decking and framing, which is a major benefit for older structures in Pasadena and La Porte, TX.
Despite being lightweight, EPDM is exceptionally flexible. It retains its elasticity across a massive temperature range, remaining fully functional from -45°C up to +120°C without cracking, melting, or breaking down. This flexibility allows the membrane to expand and contract naturally as our Texas buildings shift and settle during rapid temperature swings.
Additionally, EPDM resists UV radiation and blocks solar heat. This thermal resistance lowers the overall temperature of your roof deck, reducing the load on your HVAC system and cutting monthly cooling costs. To learn more about the physical properties of these systems, read our guide on EPDM Rubber Roofing Materials. For commercial applications requiring maximum durability, we often recommend premium options like the Hertalan EPDM roof foil Easy Cover 1.5 mm, which provides enhanced puncture resistance.
How Easy Roof EPDM Compares to TPO and Spray Foam
When comparing commercial roofing systems, EPDM, TPO (Thermoplastic Polyolefin), and Spray Polyurethane Foam (SPF) are the top three contenders. While TPO is popular for its bright white, reflective surface, it is more rigid than EPDM and requires hot-air weld equipment to seal the seams. EPDM, on the other hand, relies on cold-applied adhesives and seam tapes, making the installation process safer, quieter, and faster.
Furthermore, EPDM can be combined with spray polyurethane foam to create a “TTR” (Tensioned Tough Roof) system. This combination eliminates all possibility of leaks by combining the seamless, insulating properties of spray foam with the tough, weather-resistant outer armor of EPDM.
Choosing the right thickness is also a key factor in your roof’s performance. EPDM typically comes in 45 mil, 60 mil, and heavy-duty 90 mil thicknesses. If your roof experiences foot traffic, contains a rooftop garden, or houses heavy HVAC equipment, you should read our breakdown on Why Your Building Might Need 90 Mil EPDM Roofing.
| Feature | EPDM Rubber Roofing | TPO Membrane | Spray Polyurethane Foam (SPF) |
|---|---|---|---|
| Primary Lifespan | Up to 50 years | 15 to 25 years | 20+ years (requires re-coating) |
| Installation Method | Cold-applied adhesive (no flame) | Hot-air heat welding | Liquid spray-applied |
| Flexibility | Extremely high (remains elastic) | Moderate (can stiffen over time) | Rigid structure |
| Puncture Resistance | Excellent (especially 90 mil) | Moderate | Low (susceptible to hail damage) |
| Seams | Low (large seamless sheets available) | Heat-welded seams | Completely seamless |
How to Install EPDM Roofing in 7 Simple Steps
Installing an easy roof epdm system is highly efficient because the material is typically applied as a single, continuous sheet. This limits the number of seams and significantly reduces the risk of future leaks. Below is our professional 7-step guide to achieving a watertight, long-lasting EPDM installation.
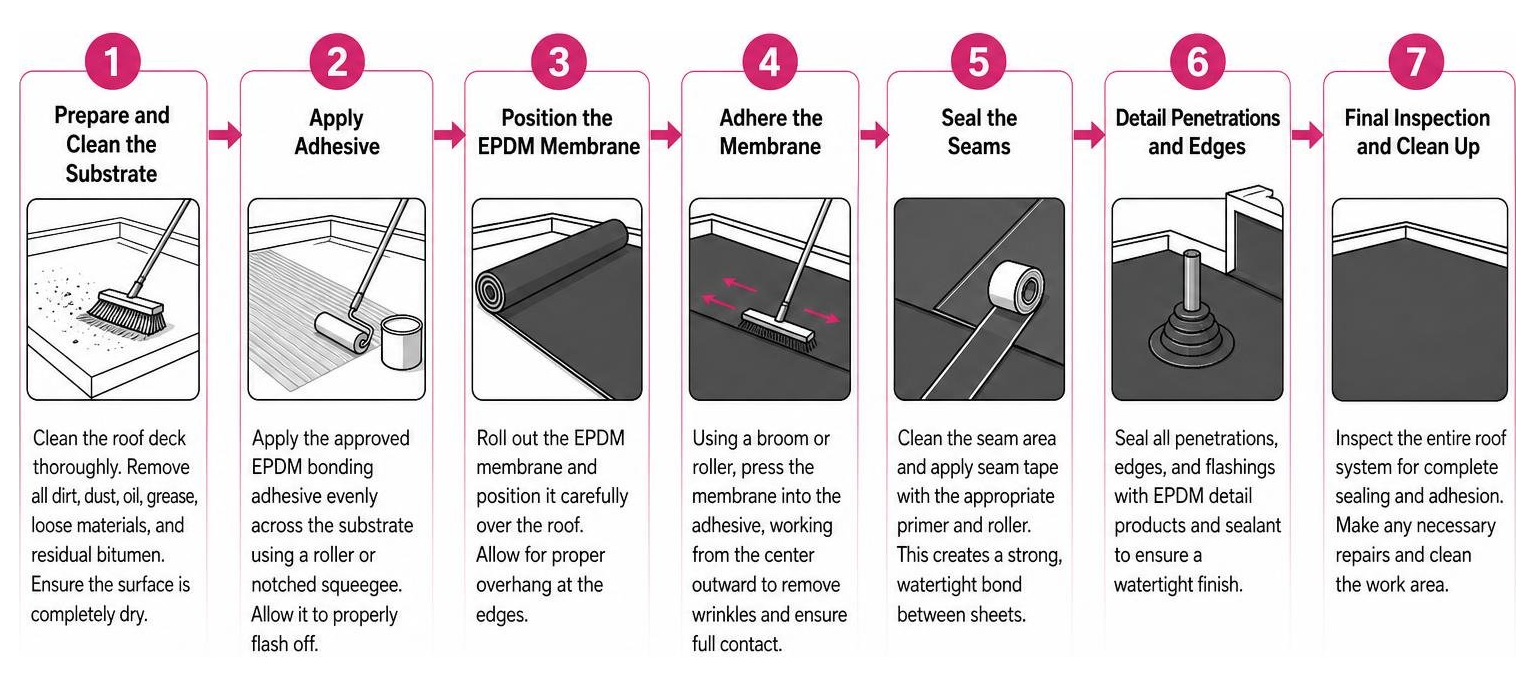
Step 1: Prepare and Clean the Roof Substrate
The golden rule of any EPDM project is simple: if the substrate is not clean, the adhesive will not stick. EPDM is best installed onto a high-quality timber deck, such as exterior-grade plywood or OSB3 boards.
Begin by clearing all dust, dirt, rust, oil, grease, and loose materials from the roof deck. If you are replacing an old roof, you must remove or overboard any residual bitumen, as old asphalt-based products will chemically degrade EPDM rubber over time. Ensure the entire surface is completely dry before proceeding. Any trapped moisture under the membrane will turn to vapor under the hot Texas sun, causing unsightly blisters and bubbles.
Step 2: Lay Out and Relax the Easy Roof EPDM Membrane
Once the deck is clean, unroll your EPDM membrane and position it across the roof. It is critical to let the rubber membrane “relax” in position for at least 30 minutes before applying any adhesive.
This relaxation period allows the manufacturing tension and shipping wrinkles to smooth out naturally. For residential flat roofs, porches, or sheds, using a made-to-measure, single-piece membrane like the EPDM Rubber roofing in 1 piece | Aquaplan is an excellent way to avoid field seaming entirely, making the installation incredibly fast and secure.
Step 3: Apply the Water-Based Deck Adhesive
After the membrane has relaxed, fold it back halfway to expose the wood substrate. Use a high-quality, water-based deck adhesive to bond the main field of the roof. Apply the adhesive using a standard 9-inch paint roller.
Be sure to leave a 150mm (6-inch) unbonded perimeter around the entire edge of the roof deck. This perimeter will be secured later using a stronger contact adhesive. Work in manageable sections, especially during hot summer days, to prevent the water-based adhesive from drying out before the rubber is laid down. If you are unsure which membrane thickness to pair with your adhesive, read our article: Is 45 Mil EPDM Rubber the Right Fit for Your Roof?.
Step 4: Bond the Membrane and Remove Air Pockets
Carefully roll the relaxed EPDM membrane back over the wet adhesive. Do not let the rubber drop or drag, as this can create large wrinkles.
Once the membrane is in place, use a soft-bristle push broom or a heavy roller to sweep across the surface. Always work from the center of the roof outward to the edges. This process forces out any trapped air pockets and ensures 100% contact between the rubber and the wet adhesive.
Step 5: Apply Contact Adhesive to the Perimeter
Now, fold back the unbonded 150mm perimeter of the membrane. Apply a thin, even coat of heavy-duty contact adhesive to both the exposed wood deck and the underside of the EPDM membrane.
Unlike water-based deck adhesive, contact adhesive must be allowed to dry until it is “touch dry” (meaning it does not stick to your finger when lightly touched) before bonding. Once dry, carefully press the membrane down onto the perimeter and use a hand roller to secure a tight, permanent bond.
Step 6: Detail the Corners and Install Edge Trims
The corners of a flat roof are highly vulnerable to water intrusion. To handle external corners without cutting the membrane, use a folding technique known as a “pigs ear.” Fold the excess corner rubber neatly against the side of the roof deck and secure it.
Next, install your drip battens and plastic edge trims (such as kerb edges and gutter trims) over the folded membrane. Compress the built-in foam seal on the trims by roughly 70% to 80% and secure them with poly-pins. For details on handling tricky transitions around walls, windows, and parapets, refer to our guide on Window Wizardry: EPDM Membrane Installation Made Easy.
Step 7: Seal the Overlaps and Penetrations
If your roof is too large for a single-piece sheet, you will need to overlap and seam multiple rolls. Clean the overlap area thoroughly with a specialized EPDM primer. Once the primer is dry, apply heavy-duty seam tape along the seam, rolling it firmly with a metal penny roller to activate the pressure-sensitive adhesive.
For roof penetrations like pipes, vents, and drains, install pre-molded EPDM pipe boots and flashing. Seal all exposed edges with a high-quality lap sealant to ensure a watertight finish.
Essential Accessories and Adhesives for EPDM Projects
A successful EPDM roof relies heavily on the quality of its accessories and adhesives. Using the wrong glue or skipping a primer can lead to premature seam failure and leaks.
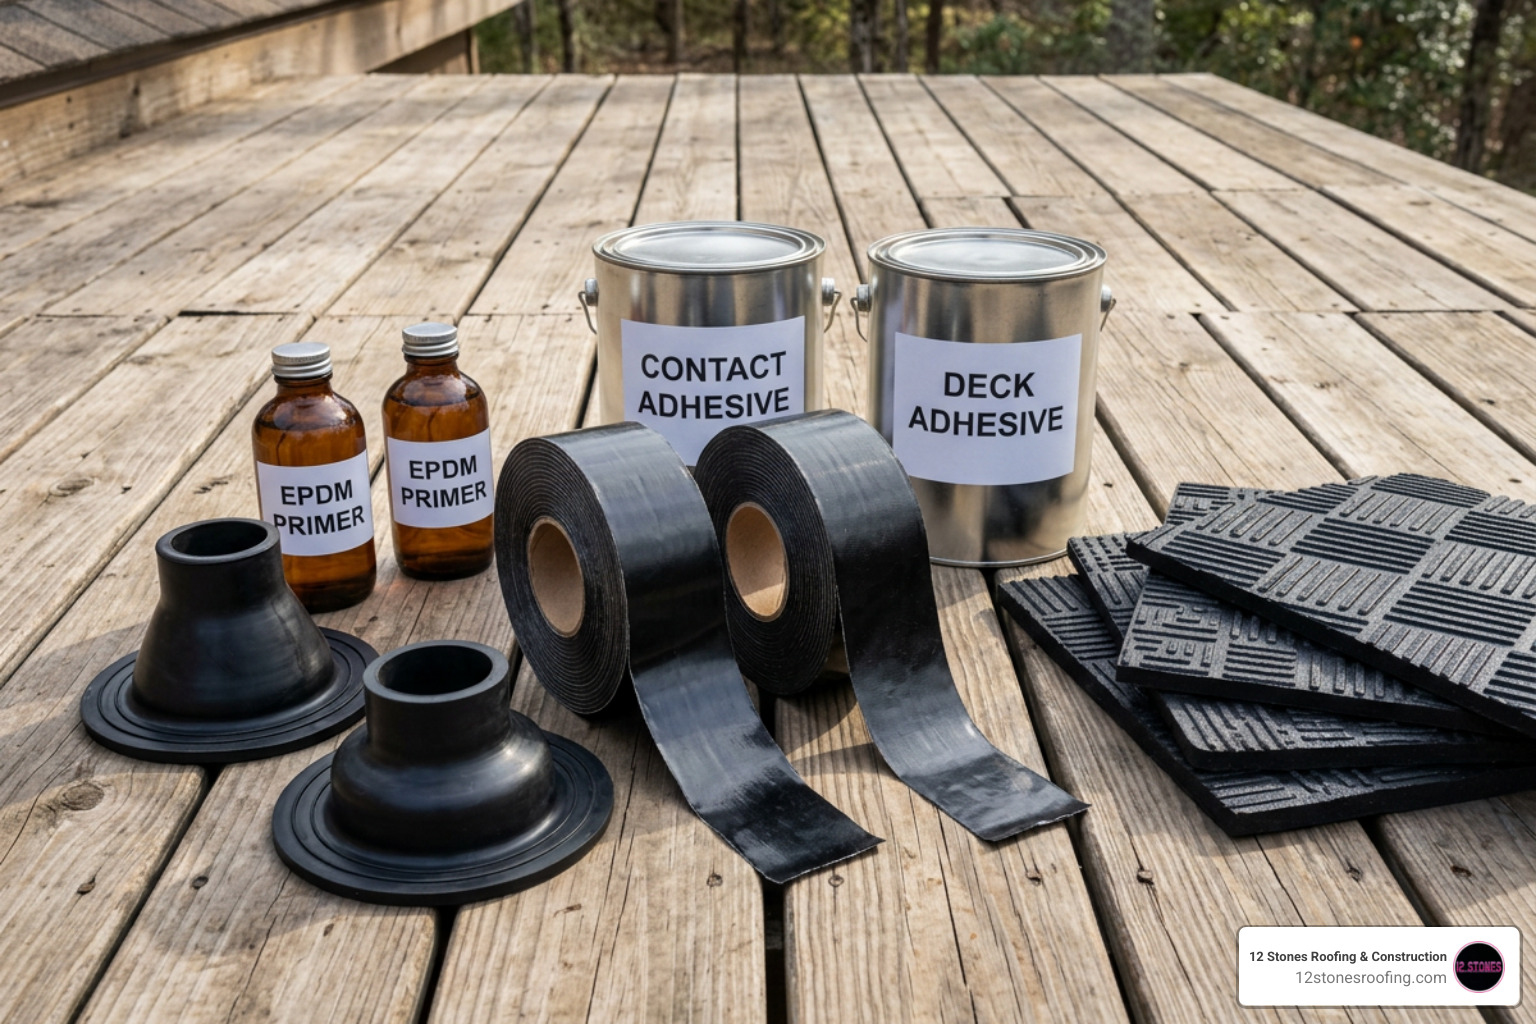
Key accessories for your EPDM project include:
- Water-Based Deck Adhesive: Used to bond the main field of the membrane to porous timber decks.
- Contact Adhesive: A high-strength, solvent-based glue used for perimeters, vertical upstands, and non-porous surfaces.
- EPDM Primer: A chemical cleaner and bonding agent that must be applied to the rubber before installing seam tape or flashing.
- Seam Tape: A highly adhesive, pressure-sensitive tape used to join separate sheets of EPDM.
- Walkpads: Heavy-duty rubber pads applied to high-traffic areas, such as around HVAC units, to protect the membrane from physical wear and punctures.
- Pipe Boots and Corners: Pre-formed, flexible rubber pieces designed to easily seal round penetrations and complex angles.
Selecting the right combination of accessories is crucial to the long-term success of your roof. To make sure you have everything needed for a commercial or residential project, read our guide on Picking the Perfect 45 Mil EPDM Rubber Roof.
Frequently Asked Questions About EPDM Rubber Roofing
How long does an EPDM rubber roof last?
Under normal weathering conditions, a professionally installed EPDM rubber roof will easily last up to 50 years with very little maintenance. Because the synthetic rubber contains no plasticizers, it does not become brittle or crack over time due to UV exposure. To learn more about why this synthetic compound performs so well over decades, read The EPDM Story: Everything You Need to Know About This Versatile Material.
Can EPDM roofing be recycled at the end of its lifespan?
Yes, EPDM is a highly environmentally friendly roofing choice. At the end of its long service life, the rubber membrane can be fully recycled into materials like playground surfaces, walkway mats, and athletic tracks. Furthermore, EPDM is completely compatible with intensive green roof systems (rooftop gardens), which help reduce urban heat island effects and lower carbon footprints.
What maintenance is required to prevent EPDM roof leaks?
While EPDM is incredibly low-maintenance, we recommend scheduling bi-annual inspections (typically in the spring and fall) to ensure its longevity. During these checks, you should:
- Clear away leaves, branches, and debris from gutters and drains.
- Inspect the seams and flashing around pipes and vents for any signs of lifting.
- Check for standing or ponding water that remains on the roof for more than 48 hours.
- Wipe away any chemical spills, oils, or petroleum-based products, which can soften and damage the rubber.
For a detailed look at potential issues and how to avoid them, read our article on The Not So Sunny Side: Common Problems with EPDM Roofing.
Conclusion
Installing an easy roof epdm system is one of the most reliable ways to protect your property from the elements. Its exceptional durability, low maintenance, and impressive 50-year lifespan make it an outstanding investment for both residential and commercial flat roofs.
While a DIY installation is highly achievable for smaller structures like sheds and garages, larger commercial projects and complex residential flat roofs require professional expertise. At 12 Stones Roofing & Construction, we bring local knowledge, top-tier materials, and strict safety standards to every project we touch in Pasadena, TX and La Porte, TX.
If you want a leak-free roof that stands up to the toughest Texas weather, let us handle the job. Contact our team today to schedule your professional inspection and get a transparent, reliable quote for your EPDM roofing project!